12 Nov How to make a Birthday Cake or Wedding Cake Pop-Up Card
In this tutorial, I will show you how to make a pop up card for birthdays or weddings. This two tiered birthday or wedding cake pop up card can be used for many occasions. The birthday pop up card is a great card to give to that special someone on their birthday. Or, you can make a wedding pop up card for that wedding couple that you couldn't find the right gift for. This round cake popup card can also be used for wedding invitations, wedding favors or thank you cards.
This popup cake card design uses ribbon for the sides of the cake so that when the card is opened, it opens completely round. If the sides are made of paper, the creases can sometimes prevent the cake from opening up completely, making the cake look oval. Plus, there are so many pretty ribbons out there to choose from, letting you customize your cake design.
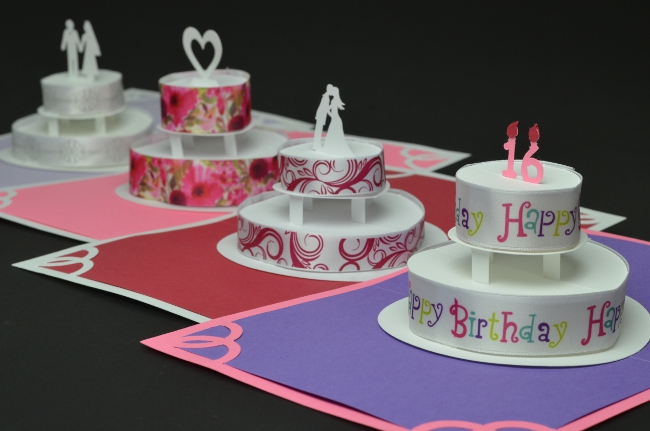
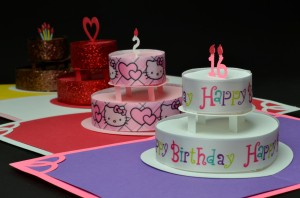
This is what the card looks like. I’ve made 4 different popup birthday card versions shown below:
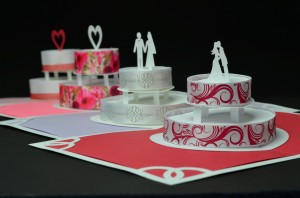
I’ve used the same template to create 4 different popup wedding card versions that can be seen in this image:
If you want to watch the card in action, check out the video of the birthday and wedding cards below:
Video Tutorial
I’ve created a video with detailed step by step instructions on how to make this pop-up card. The video was rather long so I broke it down to 2 parts. Here is the Part 1:
Here is Part 2 of the tutorial:
Step by Step Instructions
For those of you who prefer reading instructions instead of watching the video, I've written instructions on how to make this pop up card:
1. Purchase the template from the store here: Birthday or Wedding Cake Pop Up Card.
2. Find a ribbon you want to use for the sides of the cake. You can buy ribbon from Michaels or Amazon. Use cloth (satin or silk) ribbon instead of the cheap ribbon used for wrapping presents. You can test the ribbon by folding it to see if the crease stays. A small crease is ok, but a deep crease is not good. The ribbon can be either 5/8” or 7/8” thick.
3. Use the templates to cut out the pieces from card stock. You can view my tips on using templates post for more help. If you are using a 7/8” ribbon, you will need to cut out parts from page 1. If you are using 5/8” ribbon, you will need to cut out parts from page 2. Page 3 is the inside card and page 4 is the outside card. Page 5 has the extra decorations which include cake toppers, candles, some text and paper ribbon if you do not have cloth ribbon.
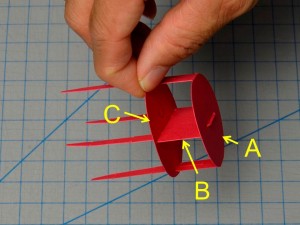
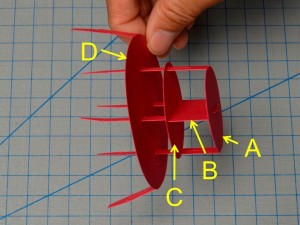
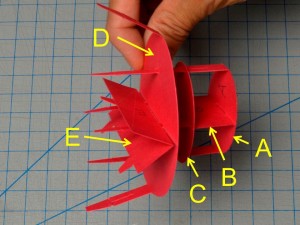
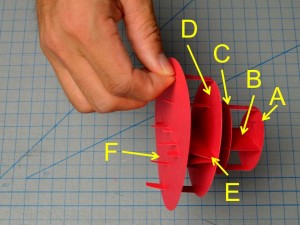
4. The cake pieces are labeled A-F. Assembled the pieces in alphabetical order. You may want to gently write the letters on the pieces to keep track. First assemble piece B into the center slot in piece A as shown in the image below:
5. Then carefully slide piece C over the legs of piece A and B.
6. Then carefully slide piece D over the legs of piece A and B.
7. Then fold piece E along the dotted line and slide it over the legs of piece B as shown below. This piece keeps the cake stable and helps the ribbon stay vertical when the card is opened.
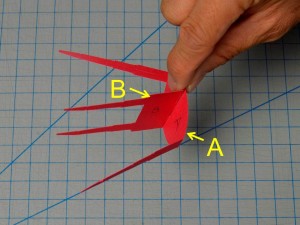
8. Attach piece F over the legs of pieces A, B and D. Carefully pull the tabs through piece F. One tip I use is to carefully “pinch” the tab while pushing piece F over the tabs, between your fingers, with a rolling motion. You can see how I “pinch” the tabs of the legs in the image below.
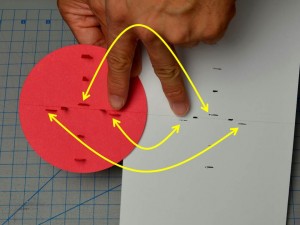
9. Insert all of the tabs from the cake legs into the inside card (found on page 3 of the template). Be careful to make sure that the tabs of piece E line up with the holes in the inside card. Make sure that all of your holes are cut through cleanly. Use the same “pinching” motion to pull the tabs through the inside card. You can see how the tabs line up with the holes in the image below.
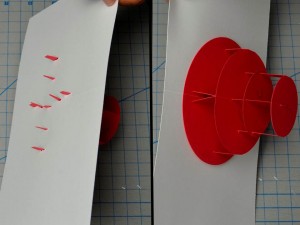
10. The image below shows the top and bottom view of the cake assembled to the inside card.
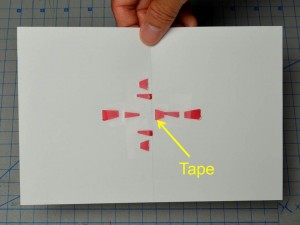
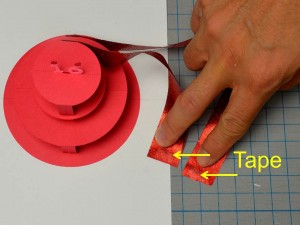
11. Tape the tabs down to the inside card as shown in the image below.
12. Choose the cake topper you would like to put on the cake. If you are making a birthday cake, you can use either single candles or numbers. You can also cut out flames to put on top of the candles. If you are creating a wedding cake, then you can use the heart or bride and groom toppers. Insert the cake topper into the hole on top of the cake. Glue the cake topper to the cake if you want to make it permanent.
13. Cut 2 strips of ribbon with lengths of 6.25” and 10.5” (16cm, 27cm). If you do not have ribbon, you can cut out the 2 strips using the template. I would suggest using paper instead of cards stock for the sides of the card if you do not have ribbon.
14. Use double sided tape to attach one end of the ribbon the back of the cake as shown below. You can also use glue, but it can get messy if the glue is not fully dried.
15. Use double sided tape to tape the loose ends of the ribbon to the backside of the card as shown in the image below. Make sure that the ribbon is not too tight. There should be about 1mm between the ribbon and the cake. This will make sure that when the cake is opened, the ribbon does not hang on the edges of the cake.
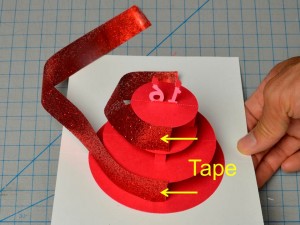
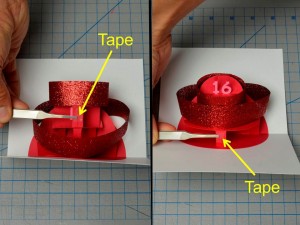
16. Close the card about half way so that the ribbon can be pushed aside from the cake. Attach another piece of double sided tape between the ribbon and the front of the cake as shown in the image below. This may be easier if you use tweezers or if you put the tape on the end of a pen because the tape can be hard to remove from your finger. Close the card and press firmly where the tape is to ensure good attachment of the ribbon to the cake.
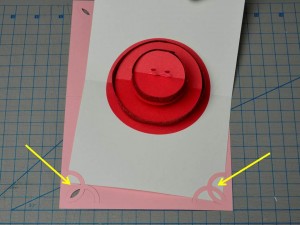
17. Cut out the card backing from page 4 of the template. Slide the inside card into the corners of the card backing as shown below.
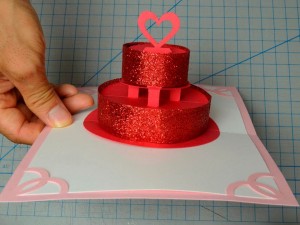
18. Open and close the card to make sure everything functions properly and the ribbon does not get caught on the cake sides. If it does, then loosen the ribbon and increase the gap between the ribbon and the cake. Here is what the final card looks like (I used a heart cake topper to show a different variation from the candles).
I hope you enjoyed this tutorial. There are a few more steps than usual, but you will be happy with the results. Please visit my template store to purchase the template for this card: Birthday or Wedding Cake Pop Up Card.

Nadine
Posted at 14:17h, 15 NovemberWhat a brill template. Chocolate cake my favorite
Creative Rich
Posted at 14:47h, 15 NovemberThanks Nadine! I saw the brown ribbon so I had to make a chocolate one.
Sandra Stonecipher
Posted at 14:34h, 15 NovemberLove it. I have been wondering where you were and so happy to see you have a new pop-up. I am buying it and can’t wait to try it out. I love all of your cards and always look forward to new ones.
Hope your baby and all are doing well. God Bless.
Sandra
Creative Rich
Posted at 14:49h, 15 NovemberHi Sandra! Thanks for the blessing! Our baby is growing up fast…she’s partly why I haven’t been as productive with new designs as I want to be.
shasheni
Posted at 22:34h, 15 Februaryplz friend help me,i love to make a creatve cards.plzzzzzz,reply my shashenialton@yahoo.com
Mike Vu
Posted at 21:57h, 15 JanuaryPlease let me know, how to get template?
Creative Rich
Posted at 22:30h, 15 JanuaryHi Mike! Thanks for visiting. You can purchase the template here: Birthday Cake or Wedding Cake Pop Up Card.
Jacky Burkhardt
Posted at 10:25h, 19 JanuaryWhere can I get the punch used for punching the corners on the card stock for the birthday/wedding pop up cake? Thanks
Creative Rich
Posted at 15:09h, 19 JanuaryHi Jacky! There are no punches used for this template. The designs at the corners are all included in the template.
Kartu Pop-Up Berbentuk Cup Cake | CODEX OF COMPLEXITY
Posted at 23:19h, 04 March[…] kartu pop-up ini saya mengacu pada blog ini : https://www.creativepopupcards.com/blog/birthday-or-wedding-cake-pop-up-card-tutorial-how-to-make-ins… dan video tutorialnya bisa dilihat di sini : Tutorial 1 […]
goundo sidibe
Posted at 04:46h, 04 Julywere did you get the pieces ?
do you made them or printer ?
CreativeRich
Posted at 13:14h, 07 JulyHi, after you purchase the template, you can print the pieces out on paper. Then you can use the paper to cut the pieces out. Here are instructions on how to use the templates. Thanks!
daniela balan
Posted at 14:27h, 19 Octoberhelloo . your work is amazing . can you tell me if you ve posted or not the template for bride and groom card ? i would like to buy it , it s wonderful.
CreativeRich
Posted at 07:54h, 20 OctoberHi Daniela, Thanks for visiting my website. I haven’t created the template for that card yet. That was the card i used for my wedding in 2008. it’s on my list of things to do. It’s a little tricky because it uses odd sized paper, so i have to re-do it so it’s more user friendly.
littleBROWNIES
Posted at 08:41h, 05 DecemberOHHH I,ll love 2 make pop up card……..i,ve tried 2 make another design 4the pop up card…. on my kids birthday…. i,ll make the invitation on my own…..i use the cartoon design…… my kids love to watch monster inc movie….sooo i make the card that i,ll get inspiration from there…. i,ll hope that you can upload your pop up card from that movie…..
#i’m sorry….. my english was bad right….
hahhaha
…GOD BLESS…
CreativeRich
Posted at 07:08h, 06 DecemberThanks for visiting my website and good luck on your cards!
Antonia
Posted at 02:31h, 25 JanuaryWhat a brilliant idea! Your website is very amazing and inspiring. Thanks for the tutorials!
Utkarsha
Posted at 10:16h, 13 FebruaryPlz tell me where I will get these templates or I should draw this
CreativeRich
Posted at 12:43h, 13 FebruaryHi Utkarsha, You can purchase the template here: Birthday Cake Template
Ciarah Johnson
Posted at 11:10h, 31 MayCan u use anything besides the ribbon if yes can u tell me wat they r??????? Thxs and I LUV the idea it a genius
CreativeRich
Posted at 12:21h, 31 MayYou can try a thin paper, but ribbon works best because it doesn’t crease as much as paper.
Neena
Posted at 21:14h, 04 OctoberHi- we loved this card and purchased it. I had a small issue with the top circle not folding completely out when the card is opened. Did I do something obviously wrong? I also had issues tearing the tabs when pulling the tabs through in the final steps. Is there a particular weight of card stock you recommend? Thanks!
CreativeRich
Posted at 22:03h, 06 OctoberMy guess is that the reason why the small circle isn’t folding out is because the beams on the sides of the circles are not pushed in all the way into the platform below it. Or, the center part is pulled in too far. Basically, your center post is shorter than the side posts. As for the tearing the tabs, you just need to do it very slowly and carefully. I usually push the small tip through the hole, then use your thumb and first finger, pinch the part that goes through. Roll your finger nails together to slowly pull the tab through in a very controlled fashion. I’m not sure that helps. Let me know if you need more clarification.
hanim aishah
Posted at 09:07h, 06 October$4.99 in US right ? Price in Malysia ?
CreativeRich
Posted at 22:02h, 06 OctoberIt’s about 16.3 Ringgit.
maxwell
Posted at 23:33h, 11 Novemberwhat all can I get with the template? like the ribbon, kissing couples ( sticked on the top) double tape and how many days can it take it to ship to hyderabad, India.
CreativeRich
Posted at 08:21h, 18 NovemberHi Maxwell, You can download your file instantly after purchase from your account after you log in. Nothing will be sent to you or emailed. Thanks!
sonam
Posted at 04:18h, 04 Decembervery beautiful greeting cards i like it very much
CreativeRich
Posted at 00:54h, 07 DecemberThanks Sonam!
elsa arendelle
Posted at 12:01h, 22 Maywhy do they cost money? i wanted to make 1 for my sisters s=weet 16 but didnt have the money online
CreativeRich
Posted at 17:13h, 24 MayHi Elsa, Thanks for visiting my website. I sell templates to support this website so I can continue sharing my designs.
Palak
Posted at 04:55h, 30 AugustAmazing card
CreativeRich
Posted at 03:15h, 09 SeptemberThanks Palak!
khawa
Posted at 21:49h, 10 Junewoowww… that’s amazing card… thank’s for your tutorial 😀
CreativeRich
Posted at 23:05h, 10 JuneThanks!