
09 May Graduation Pop Up Card: 3D Cap Tutorial
Here is the tutorial and template for the 3D graduation cap pop up card. The following instructions will show you how to make this pop up card. This card can be used for high school graduations or college graduations. You may want to decorate this card with additional cutouts or colors. Here is a picture of the finished card.
Here is the instructional video showing how to make the pop up card.
The transcript can be found here: Graduation Pop Up Card_transcript.
Here are detailed instructions on how to make the card:
- Purchase the template for this design here: Graduation Pop Up Card 3D Cap template.
- The template has many extra pieces. The primary parts are the 2 pieces that make the cap, the tassel and the body of the card. The other parts are for decorations. The tutorial video uses the 2 part “Congratulations” for the inside of the card and the smaller “Congratulations” for the outside of the card. The diploma is also used as a decoration. You can also cut the “Congratulations” out of the body of the card and use a colored outside backing. Here are the parts used in the tutorial:
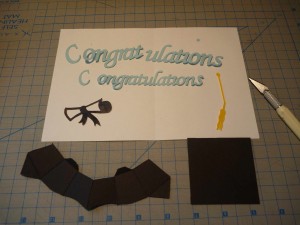
- Using the templates, cut out the body of the card. Use a pen to score the reference alignment marks through the template. These alignment marks will help you align your cap.
- Cut out the top flat part of the cap and score the parallel alignment marks with a pen. Fold the top flat cap along the diagonal fold line. Make sure that this crease bends very easily. This will help your card open up flat.
- Cut out the bottom part of the cap. Glue the ends of the bottom part of the cap together to form a ring as shown here:
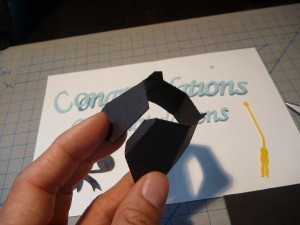
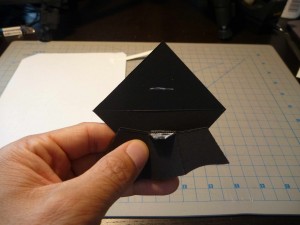
- Then glue the top flat part to the bottom ring. Align the tabs with the parallel reference alignment marks on the top part as shown here:
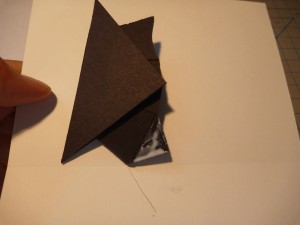
- Glue the assembled cap to the body of the card. Align the two corners of the cap to the center fold line. Also align the crease of the tab to the reference alignment marks on the body of the card. The position of the cap is shown below:
- Next, fold the tassel. This is what the tassel looks like before and after folding it:
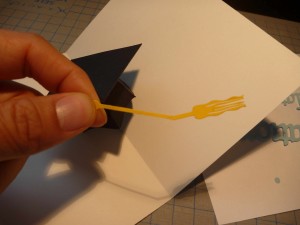
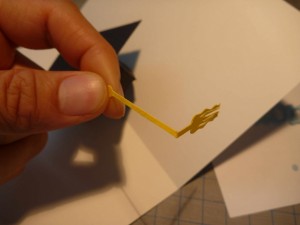
- Glue the tassel to the right side of the cap (left side of the person wearing the cap) as shown below. Glue the tassel near the crease.

- Finalize the card by gluing the “Congratulations” to the inside and outside of the card. Then glue the diploma to the inside of the card.
Update: I've added another post to clarify how to assemble the hat: Graduation cap pop up card update .
The card is now finished. When the card is closed, the corners of the cap will slide along the side of the card. The tassel is also a little long so that it stays bent when opened, although it doesn't stay bent that often.


Cade
Posted at 20:28h, 09 MayReally great stuff!!! Thank you for sharing them with us!
Dr Sonia S V
Posted at 06:08h, 14 MayVery Nice. Thank you for the tutorial
Cheers from Bangalore ,India
Dr Sonia S V
ENT Surgeon and Avid Crafter
https://cardsandschoolprojects.blogspot.com
Theshortness
Posted at 23:53h, 14 MayThis is really cute!
The top of my cap doesn’t open up flat enough though… Is there a way to fix this?
Creative
Posted at 08:19h, 15 MayI actually cut all the way through the score line in the hat, leaving the ends (corners) of the cap intact. You want to create as little resistance as possible so the hat unfolds with ease. Then fold the hat back and forth so it folds easily. Just be careful not to break either end where it is still intact.
Milenka
Posted at 10:47h, 12 JuneThank you for the tutorial, it is really kind of you to share it!
Peggie
Posted at 23:25h, 28 JulyHey this is awesome! You can start a business on it seriously cause you are so darn good at doing pop up cards!!!
Thanks for sharing.
cheers from hong kong.
Creative
Posted at 03:25h, 29 JulyThanks for visiting my website! maybe some day…too bad my day job eats up so much of my time!
Graduation Cap Pop Up Card: Gluing details | Creative Pop Up Cards
Posted at 11:29h, 10 August[…] The full tutorial for the graduation pop up card is here: Graduation Cap Pop Up Card […]
graduation cap template for cards - SCHOOL GUIDE – SCHOOL GUIDE
Posted at 21:43h, 18 August[…] My insanity: More Great Graduation Ideas Graduation Cake Pattern Graduation Caps (Printable Mortar Board Pattern) | Kids Printables … Graduation pop up card 3D cap | Creative Pop Up CardsDescription : Here is the tutorial and template for the 3D graduation cap pop up card. The following instructions will show you how to make this pop up card. This card can be used for high school graduations or college graduations. …https://www.creativepopupcards. .. […]
Vasudha
Posted at 23:05h, 10 Decembershould the size be 8.5×11?
Creative
Posted at 23:25h, 10 DecemberYes, all the templates are on 8.5″x11″ sized sheets.
Natalie Ieong
Posted at 15:28h, 02 Marchthis is so awesome! and i want to make it but i’m having difficulty downloading the template 🙁 it tells me to select payment method but i can’t seem to do that??
rebecca seddon
Posted at 09:40h, 11 Julyi have bought this how do I download the template?
thankyou
CreativeRich
Posted at 03:49h, 19 JulyHi Rebecca, click on “My Account and Downloads” in the Store and you’ll see a link to your download. Thanks!